The Correct Way To Use The Microscope
Microscope objective supplier to share with you:
First, the problem of correct installation: Before using the microscope, you must first install the eyepiece and objective lens of the microscope. The installation of the eyepiece is extremely simple. The main problem is the installation of the objective lens. Because the objective lens is more expensive, in case the screw is not closed when the student is installed, it may fall to the ground and cause the lens to be damaged. Hold the objective lens with your index finger in your left hand and the middle finger, and then mount the objective lens with your right hand so that you will not fall to the ground even if it is not installed properly.
Second, the problem of the correct light
Aligning the light is an important step when using a microscope. Some students will randomly turn an objective lens toward the clear hole when aligning the light, instead of using a low-magnification lens to light as required. I like to use one hand when turning the mirror, and often pull the mirror down. Therefore, when instructing students, teachers must emphasize the use of low-power mirrors for light. When the light is strong, use a small aperture and a flat mirror, and when the light is weak, use a large aperture, a concave mirror, and a mirror with both hands. To a uniform and bright circular field of view. After the light is aligned, do not move the microscope casually, so as to prevent the light from entering the clear aperture through the reflector.
Third, the correct use of quasi-focus helix
Using the quasi-focus helix to adjust the focal length and find the object image can be said to be the most important step in the use of the microscope, but also the most difficult step for students. Students are prone to the following errors during the operation of the microscope stand: First, focus directly under a high-power lens; second, the eye always looks in the eyepiece field of view regardless of whether the lens barrel is raised or lowered; third, the object distance Threshold value, when the object distance is adjusted to 2 to 3 cm, it is still adjusted upward, and the speed of turning the quasi-focus spiral is very fast. The first two types of error results often cause the objective lens to interfere with the mounting film and damage the mounting film or the lens, while the third error is the most common phenomenon when students use the microscope. In response to the above errors, the teacher must emphasize to the students that the focus must be adjusted under a low magnification lens. First, turn the coarse quasi-focus helix to slowly lower the lens barrel and the objective lens close to the glass slide, but be careful not to let the objective lens touch the glass. In this process, the eye should look at the objective lens from the side, then use the left eye to look inside the eyepiece, and slowly adjust the coarse focus spiral in reverse, so that the lens barrel slowly rises until the object image is seen, and at the same time to the student, It indicates that the object distance of a general microscope is about 1 cm, so if the object distance is far more than 1 cm, but the object is still not seen, it may be that the specimen is not in the field of view or the coarse quasi-focus helix is rotated too fast. Loading position, and then repeat the above steps, when blurry objects appear in the field of vision, you must use the fine quasi-focus helix adjustment, only in this way can narrow the search range and increase the speed of finding objects.

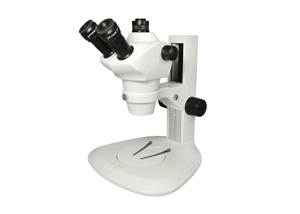
Microscope Stand
Fourth, the problem of objective lens conversion
After using a low-power lens and switching to a high-power lens, students often like to push the objective lens directly with their fingers, which is considered to be more labor-saving, but it is easy to skew the optical axis of the objective lens because the material of the converter is softer and has higher accuracy. , Uneven threads are easily loosened. Once the thread is broken, the entire converter is scrapped. Teachers should instruct students to turn the conversion objective by holding the lower part of the converter.
Five, the problem of optical glass cleaning
Optical glass is used for the lens, prism, lens, etc. of the instrument. It is easy to be stained with oil, water wet dirt, fingerprints, etc. during manufacture and use, which affects imaging and light transmittance. To clean optical glass, different cleaning agents should be selected according to the characteristics of the dirt and different structures, different cleaning tools should be used, and different cleaning methods should be selected. Lenses with antireflection coatings, such as those of cameras, slide projectors, and microscopes, can be cleaned with about 20% alcohol and about 80% ether in a cleaning agent. When cleaning, use a soft brush or a cotton ball with a small amount of cleaning agent to make a circular motion from the center of the lens outwards. Do not immerse such lenses in the cleaning agent to clean them. Do not wipe hard when cleaning the lens, otherwise, the AR coating will be damaged and the lens will be damaged.
The method of cleaning prisms and plane mirrors can be performed according to the method of cleaning lenses.
Mold on the surface of optical glass is a common phenomenon. When the optical glass is moldy, light is scattered on its surface, making the imaging blurry. In severe cases, the instrument will be scrapped. Most of the causes of mold growth of optical glass are microbial spores on its surface. When the temperature and humidity are suitable and the required "nutrients" are available, they will grow rapidly and form mold spots. It is especially important to prevent mildew and stain on the optical glass, and it should be cleaned immediately if mildew is generated.
The above-mentioned cleaning agent can also be used to clean grease mist, water-moisture mist, and oil-water mixed mist on the optical glass. The cleaning method is similar to the method of cleaning the lens.


